Frequently Asked Questions
Registering a BYOD device to a Plan V
This guide aims to show how to add devices to an account. Adding a device does not mean it will be automatically associated with a user but added to a pool of devices that can be used on creation or later on.
Directly from it911now.com
A device must be built and added to the account atlas not only to auto-provision a phone but for any phone that will register to the platform.
To begin, log in to other clients' account by impersonating them, this process find the account you wish to register a phone to and impersonate that account:

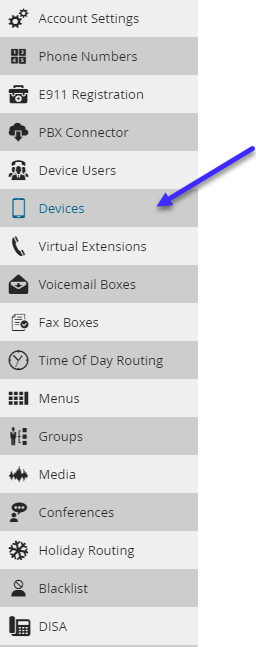
Once you have impersonated the account navigate to the left-hand side of the screen and select Devices:
We will then click on “Add Device” On the right side of the page

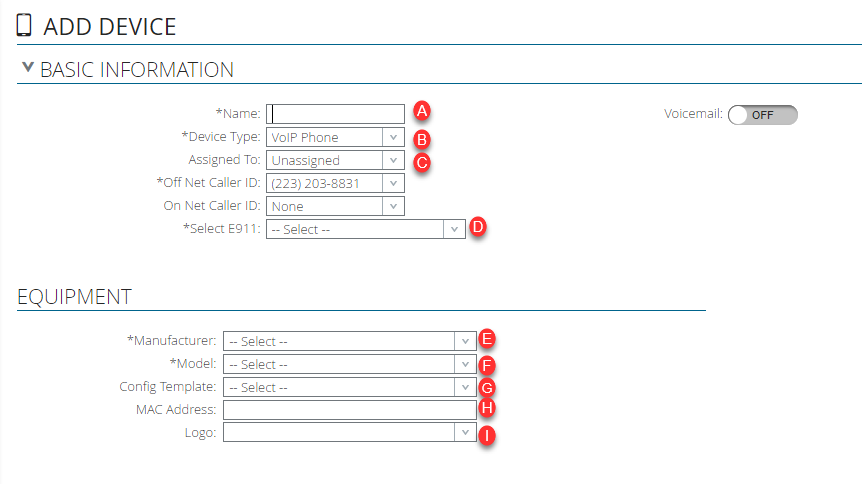
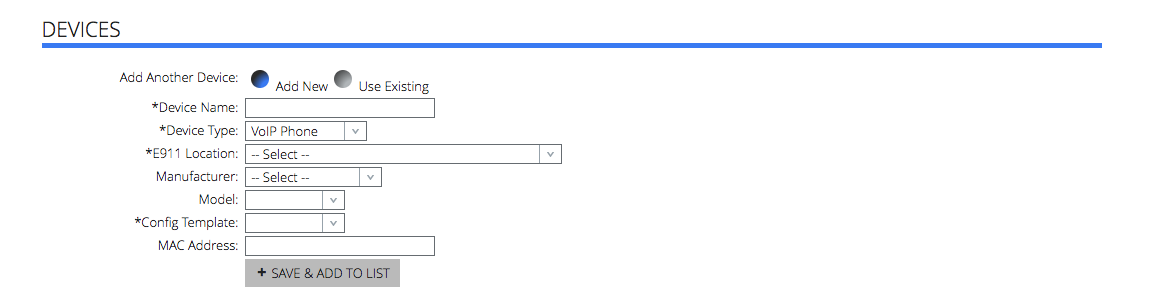
Once selected you will be presented to the Add device page, this is where you will begin adding the information to put your handset onto the Atlas platform:
Now that the required information is out of the way, we move on to some customization, and some extra information if you are manually registering the device
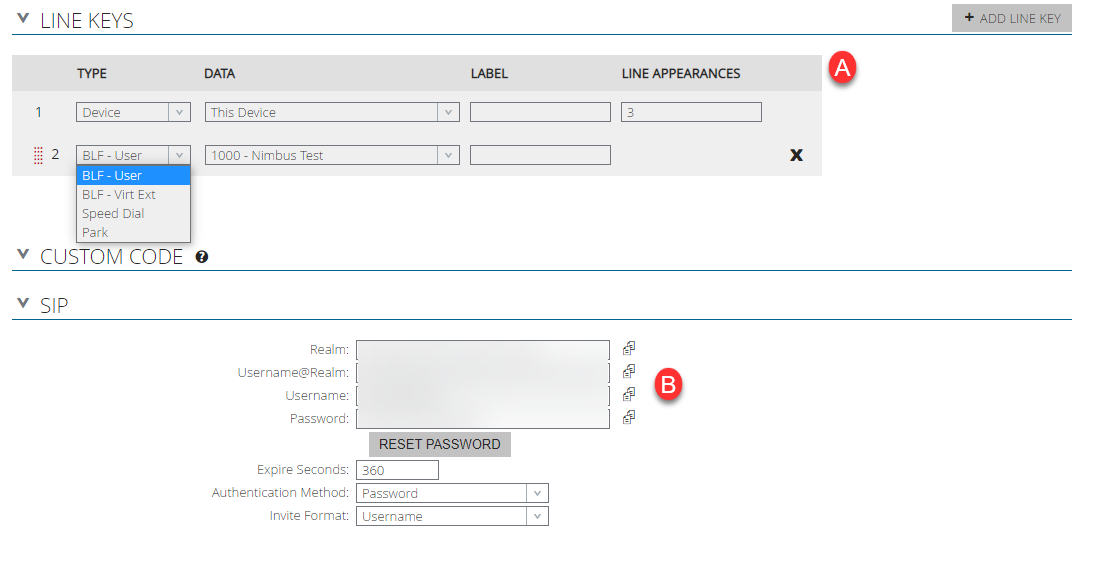
A. This is where we add line keys, BLF keys, parks, and speed dials. Simply click the “Add Line Key” button to add more, and use the “Type” drop-down to select the type of line key you’d like to add (BLF, Park, Speed Dial).
1. Please note not all devices support all line key types (For Example, if you have a Polycom, use the "Park" selection for Speed Dials) . Please refer to the admin guide of your device if you have questions regarding this, or contact support.
B. This section details the SIP information of the device; if you are manually registering the device instead of using auto-provisioning, you will use the “realm” here as the registrar and outbound proxy in the configuration of your device, you will also use the “username” and “password” fields for the authentication username and password in your device.
C. Custom Code - This section allows you to specify certain extra configuration parameters for your device that will get implemented into the template, such as multicast paging, enhanced feature keys, and settings of the like. For the specific parameters for your device, please refer to the device's admin guide or ask our support!
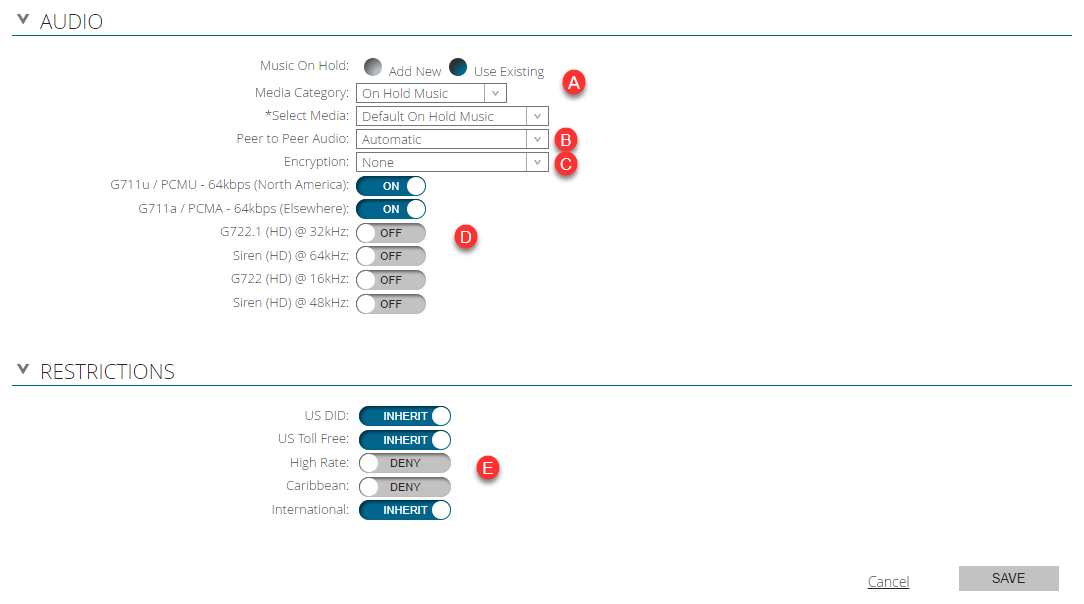
Here is where you select the media for on-hold music for the device being created. You can select media that has already been uploaded to atlas, or add new.
In the "Devices" Section of a Device User you can also add devices in a much more slimmed-down fashion, they will still be added to the "Devices" Menu within Atlas however, if you'd like to make extra modifications.
Once the information is to your liking, scroll to the bottom and click save, you have no built the device and it is now ready to be provisioned and registered!
- Step One is to log in to Atlas
- Click on "Devices"
- In the upper right corner, click "Add Device"
- Fill in all the line items that have an * before the item for example *Name:
- Under the "EQUIPMENT" fill in all the mandatory lines including the MAC address.
For the template use the first one if you're unsure. - On the device go to accounts or Lines depending on the phone.
NOTE:
This section details the SIP information of the device; if you are manually registering the device instead of using auto-provisioning, you will use the “realm” here as the "registrar" and "outbound proxy" in the configuration of your device, you will also use the “username” and “password” fields for the authentication username and password in your device.
All that you have to do is follow or use the information in the "SIP" section below marked "B".
Directly from it911now.com
This guide aims to show how to add devices to an account. Adding a device does not mean it will be automatically associated with a user but added to a pool of devices that can be used on creation or later on
A device must be built and added to the account atlas not only to auto-provision a phone but for any phone that will register to the platform.
To begin, log in to other clients' account by impersonating them, this process find the account you wish to register a phone to and impersonate that account:
Once you have impersonated the account navigate to the left-hand side of the screen and select Devices:
We will then click on “Add Device” On the right side of the page
Once selected you will be presented to the Add device page, this is where you will begin adding the information to put your handset onto the Atlas platform:
- This is the device identifier, it should be something like “John Office” or “Bob Home” it will be your line key display.
- There are a few options here:
- VOIP Phone - This is what you will most likely use a majority of the time, this is for any SIP phone or Device.
- Outside Device - This is for outside devices such as cell phones or other numbers outside of the Atlas Application, that you’d like to be able to put in things such as groups.
- Fax Device - This is used at times for Fax ATA's so the proper signaling is harbored
- This defines which device the user assigns the device to, for things such as an extension to extension dialing, voicemail, find me follow me, etc.
**The device user must already be created in order for association** - This defines the E911 location that will be provided to emergency services if a user dials 911 from this device.
** The E911 registration must be already created in order for association** - This is where you select the manufacturer of the device, there are a plethora to choose from.
- ***If you do not see the manufacturer of your device, don't worry! You can still register it to atlas more than likely, just select the Manufacturer of “BYOD-FTP” or “BYOD-TFTP” depending on how the device provisions.
- It is important to note, that a BYOD-type device will not Auto Provision; auto-provisioning is the method in which a device gets its SIP information, as well as line keys and layout from a template on atlas, which means you only need to enter the provisioning server and credentials into the phone. A BYOD device is what is known as Manually Provisioning a device, where you must enter the proxy information the (Account Realm) and SIP username/Password into the device for registration. A BYOD device will not take advantage of the "Line Keys" section on the Add/Edit Device page.
- If you are using a softphone, select the “softphone” manufacturer and model
- Here you will select the specific model of your device (Such as T42S, or VVX 400)
- This is where you select the configuration template for auto-provisioning. If you are manually registering the device (inputting the proxy, sip username and sip password into the device) then this is not required.
- This is where we place the MAC Address of the device, this is required for auto-provisioning.
- If you have a Custom Logo for your devices, you can select that here, to see how to add Logos to your portal for devices, see the Atlas Artice "Adding Logos to VOIP Phones"
Now that the required information is out of the way, we move on to some customization, and some extra information if you are manually registering the device
A. This is where we add line keys, BLF keys, parks, and speed dials. Simply click the “Add Line Key” button to add more, and use the “Type” drop-down to select the type of line key you’d like to add (BLF, Park, Speed Dial).
1. Please note not all devices support all line key types (For Example, if you have a Polycom, use the "Park" selection for Speed Dials) . Please refer to the admin guide of your device if you have questions regarding this, or contact support.
B. This section details the SIP information of the device; if you are manually registering the device instead of using auto-provisioning, you will use the “realm” here as the registrar and outbound proxy in the configuration of your device, you will also use the “username” and “password” fields for the authentication username and password in your device.
C. Custom Code - This section allows you to specify certain extra configuration parameters for your device that will get implemented into the template, such as multicast paging, enhanced feature keys, and settings of the like. For the specific parameters for your device, please refer to the device's admin guide or ask our support!
Here is where you select the media for on-hold music for the device being created. You can select media that has already been uploaded to atlas, or add new.
- New Media files for on-hold music have certain requirements: They cannot be larger than 4MB in size, and must either be a WAV or MP3 format file. The Portal will remind you of this upon clicking "Add New"
B. Peer to Peer audio describes how audio is bridged between devices, it is best to leave this as automatic
C. Here you can select whether or not you want, and what type of encryption you'd like to use, this would encrypt the audio stream between the atlas application and your end users.
C. Here you can select whether or not you want, and what type of encryption you'd like to use, this would encrypt the audio stream between the atlas application and your end users.
- ***PLEASE NOTE*** This does require a special template, and supported devices will have a "Default - Encrypted RTP" template to choose from when enabling this. If the template is not selected and this is enabled, it will not operate properly.
D. Here you will select the available codecs for the device, PCMU and PCMA are the recommended audio codecs
E. The restrictions section states whether or not a device can make calls, and where to.
- ***PLEASE NOTE*** These toggles are one of three places these need to be enabled, for example, to enable International Calling, you would need to enable this toggle on the Device, The Restrictions Section on the Device User associated, AND The Restrictions Section on the Edit Account Page.
In the "Devices" Section of a Device User you can also add devices in a much more slimmed-down fashion, they will still be added to the "Devices" Menu within Atlas however, if you'd like to make extra modifications.
Once the information is to your liking, scroll to the bottom and click save, you have no built the device and it is now ready to be provisioned and registered!
Last updated 03/22/2023 8:58 pm
Please Wait!
Please wait... it will take a second!